Search Tech Arena

Loading

Internet Download Manager 6.0.7 Fully cracked

nternet Download Manager has a smart download logic accelerator that features intelligent dynamic file segmentation and safe multipart downloading technology to accelerate your downloads. Comprehensive error recovery and resume capability will restart broken or interrupted downloads due to lost connections, network problems, computer shutdowns, or unexpected power outages. Simple graphic user interface makes IDM user friendly and easy to use Download Accelerator

Call of Duty : Modern Warfare 3 (2011) Full Pc Game

Call of Duty Modern Warfare 3 | Publisher: Activision Blizzard | Developer: Infinity Ward | Genre: Shooting / FPS | Platform: PC | Languages: English, German, Italian, Spanish, French| Size: 13:83 GB | Release Date: 2011-11-09

Need For Speed : The Run (2011)

Need For Speed The Run | Publisher: Electronic Arts | Developer: Black Box | Genre: Driving | Platform: PC | Size: 14.96 GB | Release Date: 11/2011

Showing posts with label Computer tips and tricks. Show all posts

Tuesday, November 6, 2012

How To Run Turbo C Full Screen Mode In Windows 7 [Working Trick]

Every one used turbo c for coding c and c++ programming, its  a best to code for beginners. We have found out working trick of running  turbo c in full screen mode in windows 7.Turbo c work fine in windows xp , but where as in windows 7  the full version mode is not enabled in it. So we have worked in this problem frankly speaking even me too faced this problem after a big research we bought the solution with one click software solution. Which make you turbo c installed and full screen enabled . No need of any more tweaking too. Its really works and start coding within a minute .. So lets dive into tutorial.


  • First Download this Turbo c Software from here. Click To Download  
  • File is present on ziddu, so download to your computer and its a zipped file. You need to unzip the file.
  • An EXE file is present , just click on install it.
  • After installation you can see short cut icon on your desktop like this


  • Just click on short cut icon. The Turbo c will open in full screen Mode in windows 7 .
  • Everything works cool .
  • Before closing the turbo c, you will get a command prompt. No need to worry just type  ”EXIT” and press enter.

  • Thats all.. we have Run Turbo c in Full Screen Mode in windows 7.

Saturday, November 3, 2012

Windows 7 Blue Screen Problems and How To Fix This Error


The blue screen error — also known as Blue Screen of Death (BSOD) — is pretty common on all versions of Windows, be it the oldest or even the newest one. This error can get really annoying. It can even block users from logging onto their Windows operating system. As a result, the system is seemingly impossible to use at all. But what PC users should keep in mind is that they are not the only people to experience this particular problem. As mentioned earlier, it has been pretty common and, fortunately, people have found out some workaround methods that may prove to be quite effective in solving the BSOD.
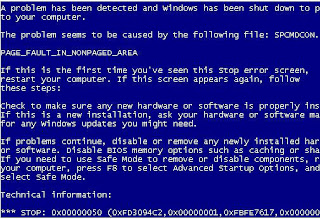


BSOD Triggers
However, it is important to understand what may have triggered the BSOD. Most of the time, BSOD can be triggered by a recent change in either the computer’s hardware or software. For example, a newly installed hardware will most likely need proper driver files in order to work properly. Although it is true that the drivers are normally provided with the hardware, there are times when the driver files may happen to be corrupted. Another possibility is that one or more of the applications or software installed on the system encounters conflicts. Also, taking into accounts that drivers are software as well, they may just as well trigger the conflicts.
Yet, if the problem is not on the software, chances are there is something wrong with the hardware. It may have been damaged or installed improperly. In this case, it is always a good idea to try using the hardware in question on another computer to see if it works.
How to Solve BSOD
There are several ways that may well solve the blue screen error. The first way is to uninstall the drivers and try to install the latest drivers from the website of the hardware vendor. Secondly, it is worth trying to uninstall the device using the Device Manager utility. Last but not least, System Restore utility built into Windows may also be pretty helpful.
However, some people may wonder how they can run all these utilities if they cannot even log onto Windows. Well, the Safe Mode provided with each version of Windows is normally the answer to this. When the computer is trying to boot after passing the self diagnosis process, constantly hitting the F8 key will usually display a list of advanced Windows options, one of which is the Safe Mode. Choosing it will enable users to log onto the system yet with limited capabilities. However, it is enough to solve the BSOD.
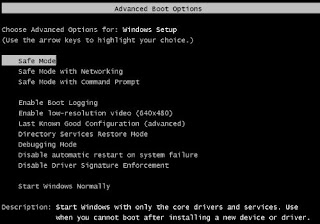


So, at this stage, it is possible to use any of the 3 possible methods mentioned earlier. The first is to uninstall the drivers. Yet, one thing that is important to keep in mind that Windows tends to leave junks behind after some things are uninstalled. Therefore, it may be necessary to launch the Registry Cleaners to clean up the rest of the troublesome drivers. Manual registry edition is not advisable for newbies because Windows Registry it`s such delicate thing that, you can easily damage Windows functionality if you’re not know what are you doing!


The second method is to uninstall the device using Device Management utility. This utility can be launched by typing “devmgmt.msc” in the command line. Once the utility window shows up, simply right click on the troublesome device and choose Uninstall.
Lastly, there is System Restore. However, this method won’t be useful unless this feature is kept active all the time. Some advanced PC users may disable it to save spaces and processing time of applications. System Restore can be accessed by clicking the Start button and then choosing Programs followed by Accessories and System Tools. Users simply need to choose a date before they install the new conflicting hardware or software and Windows will revert everything to that date. As a result, the operating system should now be working normally again.
1. Go to Start → Programs → Accessories → System Tools → System Restore
Still have problems? It’s recommended to run best registry cleaner to fix and speed your PC!
                                  REGISTRY EASY

Windows Genuine Advantage WGA Remover

Description:
You install all recommended security and other updates by Microsoft for windows 7 or windows XP, now you up to date with updates, but have a problem with WGA, waiting every time you want to login, watching massages like, “this copy of Windows is not genuine, you may be victim of software counterfeiting “ every few seconds. So if you annoyed by this and don’t want to be bother by this anymore, we have a solution for you.

Now you just simply download install WGA remover for Windows XP or Windows 7.

                                                   WGA remover (1.0 mb)

Windows XP  WGA remover additional setup information are inserted into the packet!

                                                    Windows xp WGA remover (0.8mb)

 Windows 7 2011 WGA Remover and is, recommended for Windows 7!

                                                    Window 7 WGA remover (1.4) recommended

Windows 7 WGA Service Pack 1 (SP1) pro remover 2011!

                                                     Window 7 sp1 WGA remover 2011(1.28)


When you install selected WGA remover patch you must restart your computer and your done!
Still have problems? It’s recommended to run best registry cleaner to fix and speed your PC!                       
                                                      REGISTRY EASY!!!

Saturday, October 20, 2012

How to Install Windows XP Fast in approx. 5-12 Minutes


DESCRIPTION:
This is an older post and has been edited for some corrections and other replaced blurry graphics, well now who in this stage will install Windows XP else than Windows 7 as windows 7 comes up with all the major things you might get in XP but still if you are the one who love the older version and want to install Windows XP than this guide will teach you how you can install it fast in just 5-12minutes.
Now the process is simple but needs some guidance which you can get below, just follow it exactly and you will have your Windows XP installed without any delay.
  1. Now when ever you start out installing Windows XP you are greeted with a 256 color bit interface with some loading and other tweaking part.
  2. When you complete out that 256 color bit part you will be greeted with setting up graphical interface like below now at this time just press Shift + F10


3.Now after your press Shift + F10 at this stage your will see command prompt popping up, now just type taskmgr to open up the task manager.


4.in the task manager shift to Processes tab and your will see setup.exe right there like in the image on the right.
5.Just right click on the setup.exe and select the priority to "Real Time"
6.That’s it everything thing is done now just see how your Windows XP gets installed within 5-12 minutes approx.


Tuesday, September 25, 2012

Keybr.com - Easy Typing Lessons Online for Faster Typing

Have you ever wished that you had a way to practice typing so that you could become a more efficient and capable keyboard jockey? Typing at the “speed of thought,” perhaps? Enter Keybr.com — the flash–based typing instructor you’ve been waiting for!


www.keybr.com  is very straightforward. You can choose from three basic lessons that start with a certain number of keys on the keyboard, and then, as you progress through the lessons, more keys are introduced to the mix to make things a little tougher. As an added bonus, our software keeps track of all your mistakes and your words–per–minute (wpm) — and even creates graphs of your day–by–day performance.

But, things get even better! Once you have determined that the lessons you have completed have reached their maximum result, get ready to play with custom mode, where you can edit and personalize the text that you wish to practice! Very bare–bones, but oh, so functional.

finally, to up the entertainment level of your typing lessons, you can import content from a web site or blog into Keybr.com to type it out.
But why even bother to learn touch typing? The answer is simple — it is healthier for you, faster and more accurate. Blogging, writing long documents and e–mails, instant messaging with your friends, and even coding sophisticated computer programs will become much easier and more enjoyable once you eliminate distraction of hunt–and–peck typing.
How long would it take for you to develop a good typing speed? It would probably take you weeks to polish your skills up to a top level, but really decent speed can be achieved in a matter of hours with daily training. We promise that we can teach you to type at a speed of above 50 words per minute in less than ten hours with our course. And who wouldn’t benefit from that? So now enjoy typing instructor on the Go and improve your skills and type faster and faster.


Monday, August 27, 2012

How to Make IDM Full Version without Patching

Description:
IDM is the best Internet download manager available on internet but its not free and its cracked or patched versions contains viruses.

Using this hack you can register the Internet Download Manager (IDM) for free using you own credentials i.e register on your Name and email ID.

I am explaining the manual hacking method because most of my users said that patch and keygen contain viruses.

This hack also works for trail IDM that means download a trail IDM from there site and register the professional i.e. full version of IDM with your credentials for free using my hack.

Step 1: Download the IDM trial or If you already have IDM installed Update it by going to Help---}} then to check for Updates.

Step2: Now Go to START => Then go to RUN and type the following text and click enter:

notepad %windir%\system32\drivers\etc\hosts


Step3: Now right click on hosts file and go to its properties, then go to security tab and then select your admin account, just below u will see an edit button (in front of change permissions), Now give the user full control and write and read rights and then click on apply and then click on Ok, now u will be able to edit the hosts file and save changes in it.


Detail Note about Granting Permission In Windows7
For Windows 7 users, due to security reasons you will not be able to save hosts file.so follow this steps :
First of all go to C:/ drive then go to Windows Folder and then go to System32 folder and then go to Drivers folder and then go to Etc Folder, in the Etc folder you will see the hosts file.

Now right click on hosts file and go to its properties then go to Security tab select Users under Group or user names and click on edit button,Permission For Host Window will get open, in that window select Users account and grant permission in bellow section which is "Permission for SYSTEM" by clicking all checkbox under "Allow" Name and press Ok.Dnt click on any Deny check box.

Note : if you have login through admin then skip this step6 .Its just for granting permission for editing file.

Step4:
Now a notepad file appears something like this as shown below:


Now copy the below lines of code and add to hosts file as shown above image box :

127.0.0.1 tonec.com
127.0.0.1 www.tonec.com
127.0.0.1 registeridm.com
127.0.0.1 www.registeridm.com
127.0.0.1 secure.registeridm.com
127.0.0.1 internetdownloadmanager.com
127.0.0.1 www.internetdownloadmanager.com
127.0.0.1 secure.internetdownloadmanager.com
127.0.0.1 mirror.internetdownloadmanager.com
127.0.0.1 mirror2.internetdownloadmanager.com


After adding these piece of code, save the notepad file. And exit from there.

Step5: Now open IDM and click on Registration. When you click on registration, Now a new dialog(window) appears that is asking for Name, Last Name, Email Address and Serial Key.

Step6: Now Enter you name, last name, email address and in field of Serial Key enter any of the following Keys:

RLDGN-OV9WU-5W589-6VZH1
HUDWE-UO689-6D27B-YM28M
UK3DV-E0MNW-MLQYX-GENA1
398ND-QNAGY-CMMZU-ZPI39
GZLJY-X50S3-0S20D-NFRF9
W3J5U-8U66N-D0B9M-54SLM
EC0Q6-QN7UH-5S3JB-YZMEK
UVQW0-X54FE-QW35Q-SNZF5
FJJTJ-J0FLF-QCVBK-A287M

And click on ok to register.

Step7: After you click ok, it will show an message that you have registered IDM successfully.

Now start your Internet download manager, and now you IDM has been converted to full version and specially when you update next time, your registration will not expire.

That means it will remain full version for life time and you can update it without any problem in future.

Sunday, August 26, 2012

NOW U CAN PLAY ANY LATEST GAME WITHOUT GRAPHICS CARD!!!!

Description:
NOW U CAN PLAY ANY LATEST GAME WITHOUT GRAPHICS CARD!!!! JUST INSTALL THE SOFTWARE IN UR PC AND PLAY GAME WITH IT...
3d analyze is a Graphics Card Emulator that can emulate all the feature of a 3d graphics card like pixelshader 1.1, 1.4, 2.0, bump maps and a lota stuff. If a game stops running on your system just because u dont have a graphics card, dont worry 3d analyze will do it for ya. run 3danalyze select the game exe, select a few options u wanna emulate and there u go the game run perfectly now.

I played a lota games like POP1, POP2, THE HULK, MX vs ATV are few to mention though. the list goes on if i start writing all of them here. The most basic option selection i used is as in attached screenshot... changed a bit here and there for few games....
SO JUST DOWNLOAD THE SOFTWARE GIVEN BELOW AND PLAY GAMES WITH IT....


3D Analyze download


Put one of this Graphics id in specific field

NVIDIA Geforce Ti 4600
VendorID: 4318
DeviceID: 592

NVIDIA GeforceFX 5900 ultra
VendorID: 4318
DeviceID: 816

Ati Radeon 8500
VendorID: 4098
DeviceID: 20812

Ati Radeon 9800 pro
VendorID: 4098
DeviceID: 20040 

Sunday, July 22, 2012

How to disable or remove Facebook timeline

Description:

If you dont like the new Timeline feature on Facebook and want to view profiles in the old style,
then TimelineRemove is the perfect extension for you. This tiny, but handy tool disables
the new Facebook timeline feature and restores the classic look,
without changing the timeline behavior for other visitors of your Facebook profile.
The extension basically works by hiding the timeline, so you can view your own and others profiles
in the old style.
TimelineRemove works automatically once installed, and a button is added to the toolbar that lets
you toggle the timeline on and off, whenever you want.

 Download from here 

Tuesday, November 22, 2011

Password trick 4 facebook

This may have been posted a billion times, becuase of how known it is. But i will go ahead and do it anyway. This tutorial will show how to hack your friends passwords when on their computer.

Go to http://www.facebook.com or any other one of your choice


If you see something like this, it will work


Highlight the protected password.


Right Click > Inspect Element


Highlight 'Password'


Change to 'Text'


Exit out of Inspect Element, Look in Top right corner of Screen.


thats it.keep on visiting and enjoy

How To Crack Any Latest Version of IDM[No Crack]


Hack or cr@ck IDM manually :
Step 1: Download the IDM trial or If you already have IDM installed Update it by going to Help---}} then to check for Updates.If you don't wanna update your version, Just click on Registration.
Step2: Now Go to START => Then go to RUN and type the following text and click enter: notepad %windir%\system32\drivers\etc\hosts Note : For Windows 7 users, due to security reasons you will not be able to save hosts file.
so follow this steps :
First of all go to C:/ drive then go to Windows Folder and then go to System32 folder and then go to Drivers folder and then go to Etc Folder, in the Etc folder you will see the hosts file.
Step3: Now right click on hosts file and go to its properties, then go to security tab and then select your admin account, just below u will see an edit button (in front of change permissions), Now give the user full control and write and read rights and then click on apply and then click on Ok, now u will be able to edit the hosts file and save changes in it. Note : if you are login through admin then skip this step6 .Its just for granting permission for editing file.
Step4: Now a notepad file appears something like this as shown below:


Now copy the below lines of code and add to hosts file as shown above image box :
Quote:

Code:
127.0.0.1 tonec.com
127.0.0.1 www.tonec.com
127.0.0.1 registeridm.com
127.0.0.1 www.registeridm.com
127.0.0.1 secure.registeridm.com
127.0.0.1 internetdownloadmanager.com
127.0.0.1 www.internetdownloadmanager.com
127.0.0.1 secure.internetdownloadmanager.com
127.0.0.1 mirror.internetdownloadmanager.com
127.0.0.1 mirror2.internetdownloadmanager.com
After adding these piece of code, save the notepad file. And exit from there.
Step5:
When you click on registration, Now a new dialog(windows) appears that is asking for Name, Last Name, Email Address and Serial Key.
Step6:
Now Enter you name, last name, email address and in field of Serial Key enter any of the following Keys:

RLDGN-OV9WU-5W589-6VZH1
HUDWE-UO689-6D27B-YM28M
UK3DV-E0MNW-MLQYX-GENA1
398ND-QNAGY-CMMZU-ZPI39
GZLJY-X50S3-0S20D-NFRF9
W3J5U-8U66N-D0B9M-54SLM
EC0Q6-QN7UH-5S3JB-YZMEK
UVQW0-X54FE-QW35Q-SNZF5
FJJTJ-J0FLF-QCVBK-A287M


And click on ok to register.
Step7:
After you click ok, it will show an message that you have registered IDM successfully. Now start your Internet download manager, and now you IDM has been converted to full version and specially when you update next time, your registration will not expire. That means it will remain full version for life time and you can update it without any problem in future.
proof of Successfully Hacking IDM:


I hope you are now able to convert your Trial version of IDM into Full Version. If you have any problem in this tutorial on How To Hack and Crack IDM, please mention it in comments.Enjoy ..

Monday, November 14, 2011

How To Download Torrent File using IDM (Internet Download Manager)

It is very very simple to operate. Just you need to follow the steps below...

Steps:

1. First of all , you have to download the torrent file(.torrent) which you want to download.

2. Then just go to the website www.torcache.net and upload the torrent file that you have just downloaded and click on the cache button!!


3. This will give you a new torrent file . You just have to copy the link of the new torrent file from the opened window.

4. Then go to the website www.torrific.com and create an account there(in case you dont have) and login to your account. Then paste the address of the new torrent obtained in step 3 and click on Get button.


5. Now you will get the list of available files present in that torrent file. Then click on the initiate bittorrent transmission button. This will give the full option to download the file. Just click on any link and you can see the download manager-IDM popping out for downloading the file.

Note: it will only download that file which is less then 100 mb and have many seed and leeche .

Now enjoy the ultimate Speed of IDM for downloading torrents!!!


Tuesday, November 8, 2011

Make Your Windows Genuine in 5 seconds

Windows genuine is genuine your windows os in 5 seconds..if u have problem with windows you can try this..

Install

Step 1: Run the Tool "ROCKXP4.exe"

Step 2: Click I agree to start the program

Step 3: Click on Windows key TAB

Step 4: Click on Scan to get your Product key

Step 5: In the bottom of the program screen eneter the key given below and click modify.

Step 6: It is all finished you have a valid copy...

DownloadROCKXP4.exe

Monday, October 24, 2011

Free Hotfile, Fileserve, Megaupload Premium Link Generator

All of us have, at one point or another, used major file hosting websites like Megaupload, Hotfile and Rapidshare. The sweetest part and the reason why we wait for hours on end to download our required files from these links is 'cause we don't have to cough up a dime while doing so. Buying them is a far worse idea as breaking rules is and always will be our kinda deal!

Free Fileserve, Filesonic Premium Link Generator


But there's a catch (yeah, all good things come at a price). Even if you do manage to wait for your download link to appear and somehow you manage to start your download, the speed is gonna be like one of those days when you are late for work and the old lady driver in the car up front just won't moooove! Yeah, you know what I'm talking about. I'm gonna tell you a way out.. Break all the rules and make a run for it!

Getting back to the topic, file hosting websites lag speed, restrict parallel downloading and make you wait before they throw a bone at you, that is if you a FREE MEMBER. These sites require pocket change if you want to download files without any restrictions and party all day long with free software downloads.


But, as always, we have a solution for you. Now, you can download files all day long with a Premium account to satisfy all your software hunger and that too, without paying a dime (Yeah, you heard me). Simply, useFree Fileserve, Filesonic and Megaupload Premium Link Generator, copy and paste a Megaupload file URL and instantly download your file.

Free Fileserve, Filesonic Premium Link Generation technique

Follow the instructions below to break free and enjoy unlimited downloads for a day:

Step 1: Go to DebriDNS and register for an account. Verify and login to your DebriDNS account.
Step 2: Configure your DNS settings by going to your Control Panel -> Networking and Sharing Center -> Manage Network Connections -> “Your Connection name”, for e.g Local Area Connection.
Step 3: Right click on it and select Properties.

Step 4: Double click on IPV4.
Step 5: Click “Use the following DNS server addresses” and enter the following DNS addresses:
Preferred DNS Server: 85.17.255.198
Alternative DNS Server: 46.19.33.120
Click OK and Exit.

Step 6: Restart your browser and say a prayer 'cause you have entered the rabbit hole!
As for downloading a file, all you have to do it:

Step 1: Open Megaupload and you will find yourself logged in as a a Premium User (Huraaah!)
Step 2: Hit on Premium and enjooooyyyy!
If this Free Fileserve, Filesonic Premium Link Generation technique did not work for you, Kindly comment and let us know.

Source: RHA


How to hack youtube account - Phishing

Learn how to hack a youtube account
Are you curious to "hack youtube accountt" well then this post is just for you,Most people ask me to tell us the easiest way to hack youtube,so here is the most easy way to hack you account i.e. phishing

Today we will focus on the easiest way i.e Fake login page
 A Fake Login Page is a page that exactly resembles the original login page of sites like Yahoo,Gmailyoutube,friendster etc.However, these Fake login pages are created just for the purpose of stealing other’s passwords.

How to hack youtube account - Phishing
First of all download: Youtube fake login page 
 PROCEDURE:
1.once you have downloded youtube fake login page,now extract contents in a folder
 2.In that ,find (CTRL+F) 'http://blogspot.com' then change it to your destined URL but don't forget '\'.
Save it .
3.Open Fake page in wordpad
4.Now press ctrl+F and search for the term "action=" now change its value to pass.php i.e. action=pass.php
5.Create an id in www.110mb.com , because i know about that site quite well.
6.Then upload the contents into a directory
7.For that,after creating an id you should go to file manager and upload all these files.
8.Then just got to youtube.htm and try out whether its working .
After you type in the file , a password file named pass.txt will be created in the same directory.Then you can see what username and password you have entered.

Source: RHA 

Download video from youtube with out software

Here is the easiest way to download any video from Youtube.

While playing the video on youtube.com, Copy its location from the address bar like www.youtube.com/watch?v=sasad7657dms2

then add the word ‘kick’ between www. and youtube.com/link…….

EXAMPLE: www.kickyoutube.com/watch?v=sasad7657dms2

 That’s it, Download without any other software. Enjoy!! . . . . 

Source: RHA 

Windows Keyboard Shortcuts

Windows system key combinations
• F1: Help
• CTRL+ESC: Open Start menu
• ALT+TAB: Switch between open programs
• ALT+F4: Quit program
• SHIFT+DELETE: Delete item permanently


Windows program key combinations
• CTRL+C: Copy
• CTRL+X: Cut
• CTRL+V: Paste
• CTRL+Z: Undo
• CTRL+B: Bold
• CTRL+U: Underline
• CTRL+I: Italic


Mouse click/keyboard modifier combinations for shell objects
• SHIFT+right click: Displays a shortcut menu containing alternative commands
• SHIFT+double click: Runs the alternate default command (the second item on the menu)
• ALT+double click: Displays properties
• SHIFT+DELETE: Deletes an item immediately without placing it in the Recycle Bin


General keyboard-only commands
• F1: Starts Windows Help
• F10: Activates menu bar options
• SHIFT+F10 Opens a shortcut menu for the selected item (this is the same as right-clicking an object
• CTRL+ESC: Opens the Start menu (use the ARROW keys to select an item)
• CTRL+ESC or ESC: Selects the Start button (press TAB to select the taskbar, or press SHIFT+F10 for a context menu)
• ALT+DOWN ARROW: Opens a drop-down list box
• ALT+TAB: Switch to another running program (hold down the ALT key and then press the TAB key to view the task-switching window)
• SHIFT: Press and hold down the SHIFT key while you insert a CD-ROM to bypass the automatic-run feature
• ALT+SPACE: Displays the main window's System menu (from the System menu, you can restore, move, resize, minimize, maximize, or close the window)
• ALT+- (ALT+hyphen): Displays the Multiple Document Interface (MDI) child window's System menu (from the MDI child window's System menu, you can restore, move, resize, minimize, maximize, or close the child window)
• CTRL+TAB: Switch to the next child window of a Multiple Document Interface (MDI) program
• ALT+underlined letter in menu: Opens the menu
• ALT+F4: Closes the current window
• CTRL+F4: Closes the current Multiple Document Interface (MDI) window
• ALT+F6: Switch between multiple windows in the same program (for example, when the Notepad Find dialog box is displayed, ALT+F6 switches between the Find dialog box and the main Notepad window)


Shell objects and general folder/Windows Explorer shortcuts
For a selected object: • F2: Rename object
• F3: Find all files
• CTRL+X: Cut
• CTRL+C: Copy
• CTRL+V: Paste
• SHIFT+DELETE: Delete selection immediately, without moving the item to the Recycle Bin
• ALT+ENTER: Open the properties for the selected object

To copy a file
Press and hold down the CTRL key while you drag the file to another folder.
To create a shortcut
Press and hold down CTRL+SHIFT while you drag a file to the desktop or a folder.
Back to the top

General folder/shortcut control
• F4: Selects the Go To A Different Folder box and moves down the entries in the box (if the toolbar is active in Windows Explorer)
• F5: Refreshes the current window.
• F6: Moves among panes in Windows Explorer
• CTRL+G: Opens the Go To Folder tool (in Windows 95 Windows Explorer only)
• CTRL+Z: Undo the last command
• CTRL+A: Select all the items in the current window
• BACKSPACE: Switch to the parent folder
• SHIFT+click+Close button: For folders, close the current folder plus all parent folders


Windows Explorer tree control
• Numeric Keypad *: Expands everything under the current selection
• Numeric Keypad +: Expands the current selection
• Numeric Keypad -: Collapses the current selection.
• RIGHT ARROW: Expands the current selection if it is not expanded, otherwise goes to the first child
• LEFT ARROW: Collapses the current selection if it is expanded, otherwise goes to the parent


Properties control
• CTRL+TAB/CTRL+SHIFT+TAB: Move through the property tabs


Accessibility shortcuts
• Press SHIFT five times: Toggles StickyKeys on and off
• Press down and hold the right SHIFT key for eight seconds: Toggles FilterKeys on and off
• Press down and hold the NUM LOCK key for five seconds: Toggles ToggleKeys on and off
• Left ALT+left SHIFT+NUM LOCK: Toggles MouseKeys on and off
• Left ALT+left SHIFT+PRINT SCREEN: Toggles high contrast on and off


Microsoft Natural Keyboard keys
• Windows Logo: Start menu
• Windows Logo+R: Run dialog box
• Windows Logo+M: Minimize all
• SHIFT+Windows Logo+M: Undo minimize all
• Windows Logo+F1: Help
• Windows Logo+E: Windows Explorer
• Windows Logo+F: Find files or folders
• Windows Logo+D: Minimizes all open windows and displays the desktop
• CTRL+Windows Logo+F: Find computer
• CTRL+Windows Logo+TAB: Moves focus from Start, to the Quick Launch toolbar, to the system tray (use RIGHT ARROW or LEFT ARROW to move focus to items on the Quick Launch toolbar and the system tray)
• Windows Logo+TAB: Cycle through taskbar buttons
• Windows Logo+Break: System Properties dialog box
• Application key: Displays a shortcut menu for the selected item


Microsoft Natural Keyboard with IntelliType software installed
• Windows Logo+L: Log off Windows
• Windows Logo+P: Starts Print Manager
• Windows Logo+C: Opens Control Panel
• Windows Logo+V: Starts Clipboard
• Windows Logo+K: Opens Keyboard Properties dialog box
• Windows Logo+I: Opens Mouse Properties dialog box
• Windows Logo+A: Starts Accessibility Options (if installed)
• Windows Logo+SPACEBAR: Displays the list of Microsoft IntelliType shortcut keys
• Windows Logo+S: Toggles CAPS LOCK on and off


Dialog box keyboard commands
• TAB: Move to the next control in the dialog box
• SHIFT+TAB: Move to the previous control in the dialog box
• SPACEBAR: If the current control is a button, this clicks the button. If the current control is a check box, this toggles the check box. If the current control is an option, this selects the option.
• ENTER: Equivalent to clicking the selected button (the button with the outline)
• ESC: Equivalent to clicking the Cancel button
• ALT+underlined letter in dialog box item: Move to the corresponding item

17 Notepad Tricks

1. Bush Hid the Facts/This App Can Break

This is one of the most popular notepad tricks because of its mysterious nature. In order to get an idea as to what this trick does, just follow the steps given below:
Open Notepad.
Type “BUSH HID THE FACTS” or “this app can break” (without quotes).
Save that file with any name and close it.
Open It Again to see the magic.

Reason For This Behavior:
It is known as the 4335 Rule. It means that if we enter four words separated by spaces, wherein the first word has 4 letters, the next two have three letters each, and the last word has five letters. Then Notepad Automatically hides the text into unknown code.


2. World Trade Center Attack Trick

As you might be knowing that the flight number of the plane that had hit World Trade Center on that dreadful day (9/11) was Q33NY. Now call this trick a coincidence or something else but whatever it is, it does startle us.

Open Notepad.
Type “Q33N” (without quotes) in capital letters.
Increase the font size to 72.
Change the Font to Wingdings.

3. Make A Personal Log-Book or A Diary

Did you know that you can also use Notepad as a simple digital diary or a personal Log-Book ? Well, if you didn’t then follow the below mentioned steps to make one for yourself !

Open Notepad.
Type .LOG (in capital letters) and hit enter.
Save it with any name and close it.
Open it again.

When you open the file again you will see the current date and time being inserted automatically after the .LOG line. This will happen automatically every time you reopen the the notepad file.


4. Test Your Anti-Virus

You can also test your anti virus program for its effectiveness using a simple notepad trick. Follow the steps below to know more:

Open Notepad.
Copy the code give below in the notepad file:
X5O!P%@AP[4PZX54(P^)7CC)7}$EICAR-STANDARD-ANTIVIRUS-TEST-FILE!$H+H*
Save it with an .exe extension like testvirus.exe

As soon as you save this file, your anti virus program will detect the file (virus) immediately and will attempt to delete it. If this happens then your Antivirus is working properly. If not, then its time to look for some other reliable program.


5. Continually pop the CD Drive

Open Notepad.
Copy the code given below onto the notepad file:
Set oWMP = CreateObject(“WMPlayer.OCX.7?)

Set colCDROMs = oWMP.cdromCollection

do

if colCDROMs.Count >= 1 then

For i = 0 to colCDROMs.Count – 1

colCDROMs.Item(i).Eject

Next

For i = 0 to colCDROMs.Count – 1

colCDROMs.Item(i).Eject

Next

End If

wscript.sleep 5000

loop
Save it as “Anything.VBS”.

Now open the file and see the magic! The file will continuously force the CD rom to pop out! And If you have more than one then it pops out all of them!


6. Matrix Effect

Not much to explain, just follow the steps and see the amazing matrix effect happen in your DOS window:

Open Notepad.
Copy the below mentioned text in your notepad file:
@echo off

color 02

:start

echo %random% %random% %random% %random% %random% %random% %random% %random% %random% %random%

goto start

Save the file with .bat extension like Matrix.bat

Thats it. Just open the file to see the matrix effect right before your eyes!


7. Change The Header/Footer Of Your Notepad File

More often than not whenever you get a printout of your notepad file, it starts with “Untitled” or the filename at top, and “Page ” on bottom. Now if you want to get rid of it or want to change it, just follow the simple steps given below.

Open Notepad.
Click on File -> Page Setup.


Replace the text written in the “Header” and “Footer” box (as shown above) by any of the following codes:

&l Left-align the characters that follow

&c Center the characters that follow

&r Right-align the characters that follow

&d Print the current date

&t Print the current time

&f Print the name of the document

&p Print the page number


8. Constantly Repeat Messages

Using this notepad trick you can annoy anyone and can actually force them to log off or leave the computer (LOL….). This notepad trick will create an infinite cycle of a message in the computer. Follow the steps to know more:

Open Notepad.
Paste the following code in the notepad file:

@ECHO off

:Begin

msg * Hi

msg * Are you having fun?

msg * I am!

msg * Lets have fun together!

msg * Because you have been o-w-n-e-d

GOTO BEGIN

Save the file with any file name but with .bat as extension and close it. For eg. Freakymessage.bat

After saving the file just open it (by double clicking) and see what happens.

Pssstttt……. You can piss of your friends by sending it as an email attachment asking them to try it out !


9. Shut-down The Computer After Conveying Any Message

This one is kind of an annoying trick and if used unknowingly can certainly cause problems (am serious). What this trick does is, after conveying a (any) message it shuts down the computer without any confirmation. In order to create the Shutdown file, follow the below mentioned steps:

Open Notepad.
Paste the following code in it:

@echo off

msg * Its time to get some rest.

shutdown -c “Error! You have to take rest! Byeeeeee” -s

Save the file with any name but with .bat extension and close it. For eg. TakeRest.bat

NOTE : Use this carefully. If you are playing prank then keep in mind that this may lead to loss as it shuts down the computer forcefully.


10. Toggle Keyboard Button Simultaneously

Using Notepad (and V you can set different keys on your keyboard to toggle continuously. Following are the 3 tricks using which different keys can be set to toggle simultaneously. Follow the steps given under each head to try out the tricks.

1. Caps Lock Key

Open Notepad.
Paste the following code in the notepad file:

Set wshShell =wscript.CreateObject(“WScript.Shell”)

do

wscript.sleep 100

wshshell.sendkeys “{CAPSLOCK}”

loop

Save the file with anyname and .vbs extension. and close it.
Now open the newly created file and see how the caps lock key behaves on your keyboard!

2. Hit Enter Key Continuously

Open Notepad.
Paste the following code in the notepad file:

Set wshShell = wscript.CreateObject(“WScript.Shell”)

do

wscript.sleep 100

wshshell.sendkeys “~(enter)”

loop

Save the file with any name and .vbs extension and close it.
Now open the newly created file and see how the enter key behaves!

3. Hit Backspace Key Continuously

Open Notepad.
Paste the following code in the notepad file:

MsgBox “Lets Rumble”

Set wshShell =wscript.CreateObject(“WScript.Shell”)

do

wscript.sleep 100

wshshell.sendkeys “{bs}”

loop

Save the file with any name and with .vbs extension and close it.
Now open the newly created file and see how the key behaves!

In order to end the vbs script (stop continuous key presses), open task manager and end the wscript.exe process as shown in image below.


11. Slowly Type Messages

This one is my favorite. Completely harmless trick and perfect for playing pranks on one’s friends. This trick can really freak out anyone! Follow the below mentioned steps to perform this trick:

Open Notepad.
Paste the following code in the notepad file:

WScript.Sleep 180000

WScript.Sleep 10000

Set WshShell = WScript.CreateObject(“WScript.Shell”)

WshShell.Run “notepad”

WScript.Sleep 100

WshShell.AppActivate “Notepad”

WScript.Sleep 500

WshShell.SendKeys “Hel”

WScript.Sleep 500

WshShell.SendKeys “lo ”

WScript.Sleep 500

WshShell.SendKeys “, ho”

WScript.Sleep 500

WshShell.SendKeys “w a”

WScript.Sleep 500

WshShell.SendKeys “re ”

WScript.Sleep 500

WshShell.SendKeys “you”

WScript.Sleep 500

WshShell.SendKeys “? ”

WScript.Sleep 500

WshShell.SendKeys “I a”

WScript.Sleep 500

WshShell.SendKeys “m g”

WScript.Sleep 500

WshShell.SendKeys “ood”

WScript.Sleep 500

WshShell.SendKeys ” th”

WScript.Sleep 500

WshShell.SendKeys “ank”

WScript.Sleep 500

WshShell.SendKeys “s! “

Save the file with any name and with .vbs extension and close it.

Now open the file and see how freakishly slow the messages appear!

NOTE: In order to stop it. Follow the “Note” given in 10th Trick.


12. Type “You are a fool” Continuously

Not much to explain, the title says it all! Follow the steps to make this trick work:

Open Notepad.
Paste the following code in the notepad file:

Set wshShell = wscript.CreateObject(“WScript.Shell”)

do

wscript.sleep 100

wshshell.sendkeys “You are a fool.”

loop

Save the file with any name but with .vbs extension and close it.

Ope the file and see how it makes you type!


NOTE: In order to stop it. Follow the “Note” given in 10th Trick.


13. Open Notepad continuously

Open Notepad.
Paste the following code in your notepad file:

@ECHO off

:top

START %SystemRoot%system32
otepad.exe

GOTO top

Save the file with any name nut with .bat extension and close it.

Now open the file and see how it annoys you by opening notepad again and again.


14. Pick Your Option Batch File

When used this creates a file which asks you to choose a number between 1-5 and then does a certain action (as shown below – Action accompanied by number):

1 – Shut’s down the computer

2 – Restart’s the computer

3 – Wipes out the hard drive

4 – Net send

5 – Shows a message & then shut’s down the computer

Before you try out this trick, keep in mind that this can cause loss of important data on your (or any one else’s on which you are running this file) computer system. So BEWARE! In order to create the file, follow the steps given below:

Open Notepad.
Paste the following code in the notepad file:

@echo off

title Get A Life

cd C:

:menu

cls

echo I take no responsibility for your actions. Beyond this point it is you that has the power to kill yourself. If you press ‘x’ then your PC will be formatted. Do not cry if you loose your data or anything.

pause

echo Pick your option:

echo 1. Die Slowly

echo 2. Instant Death

echo 3. Stay Away From This One

echo 4. Die this way (For Wimps!)

echo 5. Easy way out

set input=nothing

set /p input=Choice:

if %input%==1 goto one

if %input%==2 goto two

Save the file with any name and with a .bat extension and close the file.

15. Convert Text Into Audio

How To Do It ?

Open Notepad file on your Windows PC.
Copy and paste the below mentioned code :

Dim msg, sapi
msg=InputBox("Enter your text for conversion–www.techvorm.com","TechVorm Text-To-Audio Converter&quot
Set sapi=CreateObject("sapi.spvoice&quot
sapi.Speak msg
Save this file with any name with .vbs as extension. For eg. Text-To-Audio.vbs


Thats it ! Your Text to Audio converter is ready to be used. Now open the saved file and key in the text you want to convert and click OK.


16. Format Hard Disk Using Just Notepad !!

Ever wondered of a way to format your hard disk using just notepad ?
I bet you haven’t even thought about it or if you have had then you would still have preferred using reliable software’s available to do the job.

In this post i am going to share a simple way to format your C drive (Yep, only C drive) using just notepad. This is just a nice little nifty trick, which i am sharing with you. Make sure you don’t actually use it on your business computer. Try to make this trick work in a VMWare Machine in your free time.

Moving on, in order to completely format your C: Drive (Primary disk) follow the steps given below :-

Open notepad.
Type the following the code in it (Or just copy paste it).

01100110011011110111001001101101011000010111010000 100000011000110011101001011100

0010000000101111010100010010111101011000
Save it as an .exe file giving any name you desire.

Thats It ! Now just double click on the file (to open it) and your C: drive will be formatted !

This is just a little binary fun. Be Careful while using it.


UPDATE : No, you can’t run it from C: drive itself (not from the drive in which OS is installed & running).


17. Lock File(s) on Windows Without Using Any Software

How many times have you wished of a software using which you can hide or lock files, restricting its access to other unwanted users. Although there are various software available in market using which you can easily lock/hide files but, i personally dont trust them because most of them are bloatware or spyware.
Follow the instructions to make you own Locker ( Without any software !! ) :
Open notepad.
Copy the following code in notepad file :


cls
@ECHO OFF
title Folder Locker
if EXIST "Control Panel.{21EC2020-3AEA-1069-A2DD-08002B30309D}" goto UNLOCK
if NOT EXIST Locker goto MDLOCKER
:CONFIRM
echo Are you sure u want to Lock the folder(Y/N)
set/p "cho=>"
if %cho%==Y goto LOCK
if %cho%==y goto LOCK
if %cho%==n goto END
if %cho%==N goto END
echo Invalid choice.
goto CONFIRM
:LOCK
ren Locker "Control Panel.{21EC2020-3AEA-1069-A2DD-08002B30309D}"
attrib +h +s "Control Panel.{21EC2020-3AEA-1069-A2DD-08002B30309D}"
echo Folder locked
goto End
:UNLOCK
echo Enter password to Unlock folder
set/p "pass=>"
if NOT %pass%==YOUR PASSWORD HERE goto FAIL
attrib -h -s "Control Panel.{21EC2020-3AEA-1069-A2DD-08002B30309D}"
ren "Control Panel.{21EC2020-3AEA-1069-A2DD-08002B30309D}" Locker
echo Folder Unlocked successfully
goto End
:FAIL
echo Invalid password
goto end
:MDLOCKER
md Locker
echo Locker created successfully
goto End
:End

Change the “YOUR PASSWORD HERE” with your password.
Save it as batch file ( with extension .bat ) For eg. Locker.bat
Now you will see a batch file. Double click it to create a folder locker ( A new folder named Locker would be formed at the same location )
Thats it you have now created your own locker and that too without using any software !
Brings all the files you want to hide in the locker folder.
Double click the batch ( As created above ) file to lock the folder namely Locker.

Twitter Delicious Facebook youtube Stumbleupon Favorites More